Entity access

|
Entity access |
|
AutoLISP has the ability to interact with the drawing database. In addition to the system variables (covered in Lesson 5) this interaction includes the following:
An AutoCAD drawing is actually a database that includes information on every entity in the drawing. When the drawing is loaded into memory, the information on each individual entity is stored at a certain location in memory. The hex number which points to this location is called the entity's name. This may seem a little strange. After all, every entity has another name which identifies its type -- line, circle, arc, polyline, text, etc. Don't confuse these "type names" with entity names in AutoLISP, which are hex pointers to locations in memory.
In order to extract information about a particular entity, you must first know its name (location in memory). Once you know its name, you can extract an association list which fully describes the entity. This process is explained below under "Extracting an entity's description with entget."
There are two basic ways to retrieve entity names. The first way is to work with the drawing as a database, using the entlast and entnext functions. The second way is to select items graphically on the screen using the entsel and ssget functions. These four functions are explained below.
The entlast function
The entlast function simply reports the name of the last entity in the drawing database. It uses no arguments.
Suppose you have just drawn a circle in your drawing. That circle appears at the end of the drawing database. Thus, the following expression will extract its name and assign it to variable en.
(setq en (entlast))
The entity name itself might look something like the following:
The entnext function
Whereas the entlast function retrieves the name of the last entity in the drawing database, the entnext function can retrieve the name of the first entity in the database, or the next entity after another entity whose name is already known.
For example, entnext without any arguments retrieves the name of the first entity in the drawing database, as follows:
(setq en (entnext))
However, once an entity name is known (because it has been retrieved with entnext, entsel, etc.), that entity name can be submitted to the entnext function to retrieve the name of the next entity in the database, as follows:
(setq en2 (entnext en1))
If there are no more entities in the database, entnext returns nil.
Thus, a loop can be set up which steps through all the entities in the drawing database, as follows:
(setq en (entnext))
(while en
...[various expressions]...
(setq en (entnext en))
)
The first line above extracts the name of the first entity in the database (assuming there is at least one). Thus, the first time into the while loop, the test will pass, and various things can be done with en (usually certain information about the entity will be extracted with entget, and possibly the entity will be modified). Then, at the end of the while loop, the entnext function is used again with en as its argument. This causes entnext to return the name of the next entity in the database. Assuming there is a next entity, the test in the while loop again passes and the various expressions can work with it. This continues throughout the entire database.
Both entlast and entnext work directly with the database, requiring no input from the user.
Selecting single items with entsel
Suppose you want your program to work with information from the database about one particular entity selected by the user. The entsel function accepts a prompt as an argument, and returns not only the name of the entity that has been picked, but also the location at which it was picked. For example:
(setq enpp (entsel "\nSelect entity: "))
might return something like this:
(setq en (car enpp))
You can extract the pick point and put it in variable pp by using an expression like this:
(setq pp (cadr enpp))
Building a selection set with ssget
The ssget function allows the user to select entities on screen using the same fully interactive selection methods typically used in AutoCAD. In other words, when prompted the user can select an individual item, can window several items, can use crossing windows, regular and crossing polygons, and can even remove items or groups of items just as can be done when selecting entities for commands such as LIST, MOVE, COPY, SCALE, etc. The ssget function returns a selection set. Special commands are needed to extract the individual entity names from this selection set. Typical program expressions to build the selection set and place it in variable ss might look like the ones below. Notice that, since ssget does not accept a prompt, the prompt is displayed with the princ function.
(princ "\nSelect items (Press 'Enter' when done):
")
(setq ss (ssget))
Then typical expressions to extract the individual entity names from the selection set might look like this:
(setq indx -1)
(repeat (sslength ss)
(setq indx (1+ indx))
(setq en (ssname ss indx))
(setq el (entget en))
...[various expressions]...
)
In the above expressions, the ssname function extracts an individual entity name from the selection set. Its two arguments are an index integer (which uses zero based counting), and a selection set. Variable indx is set to -1 so that it will become 0 the first time through the repeat loop. Each time through the loop increasing index numbers cause ssname to extract subsequent entity names which are each assigned to variable en in turn. Each entity name is submitted to the entget function to retrieve the full description of the entity.
The ssget function also accepts a mode string as an argument. This mode string can specify a certain point or window to automate graphic selections. It also accepts selection filters for automatically including entities that meet certain criteria. See ssget in "18 - Selection sets" in the "Catalog of function definitions."
Extracting an entity's description with entget
The entget function takes an entity name as its argument. It returns a full description of the item in the form of an association list, that is, a list in which each aspect of the entity is associated with a particular code number. For example, here is an association list which describes a line (code 0) on layer "Object" (code 8) which starts at 4,3 (code 10) and goes to 4,8 (code 11).
((-1 . <Entity name: #######>) (0 . "LINE") (8 . "OBJECT") (10 4.0 3.0 0.0) (11 4.0 8.0 0.0))
Note other examples of association lists under entget in "16 - Entity access" in the "Function definitions."
Practice session
Draw a circle anywhere on screen, making a mental note of its location and size. Then use (setq en (entlast)) to obtain its entity name, then use (entget en) to obtain its full association list. Create another circle in a different location with a different radius and obtain its association list. Compare the differences in the association lists. Notice that single items such as entity name, entity type, layer name, radius, etc. are stored in dotted pairs, while other items such as coordinates are stored in regular lists.
Do the same for a point, line, arc, text, polyline, ellipse, and block.
The assoc, subst, and entmod functions
First, we will discuss association lists in general. Then we will discuss association lists which come from the drawing database and represent drawing entities.
An association list is a list containing sublists. Each sublist contains a key and a value. Sometimes the value will have several parts, such as the three coordinates of a point. Other times the value will be a single item, in which case the sublist includes only two items (the code and the value) and is stored in memory as a dotted pair.
An association list which uses the four integers 1,2,3,4 as keys can be created in the following manner:
(setq alist (list (cons 1 "one") (cons 2 "two") (list 3 "red" "green" "blue") (list 4 -800 800)))
The above would produce the following association list:
((1 . "one") (2 . "two") (3 "red" "green" "blue") (4 -800 800))
The assoc function can be used to extract specific information from an association list. For example,
(assoc 2 alist) returns (2 . "two")
(cdr (assoc 2 alist)) returns "two",
which is an atom
Similarly,
(assoc 4 alist) returns (4 -800 800)
(cdr (assoc 4 alist)) returns (-800
800), which is a list
Notice that the cdr function is used to extract both atoms and lists, since the atoms are stored in dotted pairs.
Suppose we want to change the pair of numbers associated with key 4, from -800 and 800, to -555 and 222. We would use the subst function. The syntax for the subst function involves three arguments: the new sublist, the old sublist, the association list. For example:
(subst (list 4 -555 222) (assoc 4 alist) alist)
The above expression returns ((1 . "one") (2 . "two") (3 "red" "green" "blue") (4 -555 222)), but alist remains unchanged. If we wanted alist to contain the altered list, we would have to reassign alist, as follows:
(setq alist (subst (list 4 -555 222) (assoc 4 alist) alist))
Suppose we want to change the number associated with key 2, from "two" to "twenty," the subst function would look like this:
(subst (cons 2 "twenty") (assoc 2 alist) alist)
The above expression returns ((1 . "one") (2 . "twenty") (3 "red" "green" "blue") (4 -800 800)), but again alist remains unchanged.
(Of course, the subst function can be used with all kinds of lists, not just association lists, but here we are concerned only with association lists.)
Now lets apply this to association lists extracted from the drawing database. We will use the same association list, shown below, for the line to which we referred in an earlier section. Assume that this association list is assigned to variable el.
((-1 . <Entity name: #######>) (0 . "LINE") (8 . "OBJECT") (10 4.0 3.0 0.0) (11 4.0 8.0 0.0))
Note the information extracted by the following expressions:
(cdr (assoc 0 el)) returns "LINE" --
an atom
(cdr (assoc 8 el)) returns "OBJECT"
-- an atom
(cdr (assoc 10 el)) returns (4.0 3.0
0.0) -- a list
(cdr (assoc 11 el)) returns (4.0 8.0
0.0) -- a list
To create an association list which represents a line starting at 3.0,3.0 rather than 4.0,3.0, and to place the list back in variable el, we could use the subst function as follows:
(setq el (subst (list 10 3.0 3.0 0.0) (assoc 10 el) el))
If the new starting point is in variable np, then the following line would accomplish the same thing.
(setq el (subst (cons 10 np) (assoc 10 el) el))
Even though el originally came from the drawing database, end even though we have modified it and reassigned the altered list to the same variable, this does not change the drawing data base. That change is made with the entmod function as follows:
(entmod el)
Creating new entities with entmake
The entmake function will create a new entity in the drawing database and place it on screen. Entmake takes one argument, an association list describing the entity to be created. The association list could theoretically be built up from scratch, but often it will be a modified association list derived from an existing entity. For example, at the end of the previous section we had a valid entity list in variable el. If we submit el to the entmod function, as we did there, the entity (from which the association list was originally taken) is modified. But if we submit el to the entmake function, as shown below, the old entity remains unchanged and a new, modified entity is created.
(entmake el)
Another practice session
For each of the following examples, draw the entity as described. Then use AutoLISP to modify the entity. In the first two examples the AutoLISP modifications are completed for you.
1. Draw a circle with center at 4,4, radius .5. Modification: move circle so center is at 2,2.
(setq en (entlast))
(setq el (entget en))
(setq el (subst (list 10 2.0 2.0 0.0) (assoc 10
el) el))
(entmod el)
2. Draw an arc with center at 4,4, radius .5, running from 0 to 90°. Modification: extend it to 180°. (The angles are stored in the drawing database as radians.)
(setq en (entlast))
(setq el (entget en))
(setq el (subst (cons 51 pi) (assoc 51 el) el))
(entmod el)
3. Draw a line from 4,2 to 6,2. Modification: move
the endpoint from 6,2 to 7,4.
4. Draw a circle with center at 1,5, radius .75. Modifications:
move center to 1,6 and change radius to 1.25.
5. Draw text which says "Hello" starting at 1,1, with a height
of .375. Modifications: change height to .75 and "Hello"
to "Dr. Livingston."
Sample program 1, c-scale
This program scales several circles selected by the user, each circle being scaled by the same factor. It illustrates several of the functions described in this lesson.
The program builds the selection set by use of the ssget function (line 4).
In the repeat loop (starting at line 11), each entity name is extracted in turn from the selection set by means of the ssname function. That entity name is then submitted to the entget function to extract the association list that describes the entity. If the entity is a circle, its old radius (associated with code 40) is extracted, multiplied by the scale factor, then the new radius is substituted in the association list and the database is modified.
The first if statement (line 5) guards against a null selection set. The second if statement (line 16) keeps the program from trying to change the radius of an entity that is not a circle.
------ marker ------ beginning of working program ------ try it out ------
;| C-SCALE, short for Circle-SCALE
Copyright © 1988,1998 Ronald W. Leigh
Input: Scale factor, selection of circles
Output: Each circled scaled by factor
Variables:
el Entity association list
en Entity name
et Entity type
indx Index number for successive entities in the selection
set
nrad New radius
orad Old radius
sf Scale factor
ss Selection set
|;
(defun c:c-scale (/ el en et indx nrad orad sf ss)
;line 1
(graphscr)
;line 2
(princ "\nSelect circle(s) to be scaled ('Enter' when done): ")
;line 3
(setq ss (ssget))
;line 4
(if (null ss)
;line 5
(princ "\n** No items selected.")
;line 6
(progn
;line 7
(initget 7)
;line 8
(setq sf (getreal "Enter scale factor: "))
;line 9
(setq indx -1)
;line 10
(repeat (sslength ss)
;line 11
(setq indx (1+ indx))
;line 12
(setq en (ssname ss indx))
;line 13
(setq el (entget en))
;line 14
(setq et (cdr (assoc 0 el)))
;line 15
(if (= et "CIRCLE") (progn
;line 16
(setq orad (cdr (assoc
40 el)))
;line 17
(setq nrad (* sf orad))
;line 18
(setq el (subst (cons
40 nrad) (assoc 40 el) el)) ;line 19
(entmod el))))))
;line 20
(princ)
;line 21
)
;line 22
-------- marker -------- end of working program -------- try it out --------
Sample program 2, cove
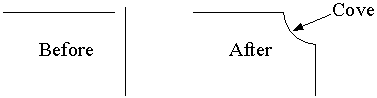
This program creates a cove (a "reverse fillet") between two existing lines. The lines must intersect (or, intersect if extended) and must both lie in a plane parallel to the current UCS. They can be at any angle to each other (not just 90°), but they cannot be parallel or coincident. The program always creates an arc that is less that 180°.
The program asks the user for the cove radius, then prompts the user
to select the two lines. After that the program has several tasks,
including:
- finding where the two lines intersect (this becomes
the center of the cove arc)
- finding which endpoint on each line is closest
to the intersection point
- altering the appropriate endpoint on each line
- drawing the arc (must be less than 180°)
Section 20 The entsel and entget functions are used to retrieve information from the drawing database about the two selected lines. The inters function is then used to find the intersection of the two lines, which is stored in variable cen. This point becomes the center of the arc which forms the cove.
Section 30 It is possible that the two selected lines are either parallel or coincident. In either case a cove is inappropriate. Fortunately, the inters functions returns nil in both of these cases. So, when a cove is possible, cen contains a point. Otherwise cen is nil. Thus, cen is used as the test at the beginning of section 30. If cen is nil, the ". . . Cove impossible" message is displayed. But if it contains a point, then the rest of the program, which is all contained within the progn function, executes.
Notice the location of variables a, b, c, and d in the "diagram" in the documentation at the beginning of the program. This will help you understand the discussion in the next paragraph and the discussion under "Section 50" below.
In order for the ends of the cove arc to fall exactly on the ends of the lines, the endpoints of the lines must be moved. The intent of the program, for each line, is to preserve the endpoint farthest from the center of the cove and adjust the position of the endpoint nearest the center. The program, as it is extracting the endpoints of each line (at the end of section 20), has no way of knowing which endpoint was created first (which would be associated with code 10) and which endpoint was created second (which would be associated with code 11). Thus, regarding the first line for example, the endpoint that needs to be moved might be in variable a, or it might be in variable b. The two if expressions in section 30 test this situation, and if needed, swap the values in a and b, or if needed, in c and d.
You might consider altering the program so that instead of merely preserving the longer section of each line, it preserves the section of the line where the user picked the line. (Remember that the entsel function returns both the entity name and the point at which the entity was picked.)
Section 40 Notice the use of the subst and entmod functions to modify the drawing database.
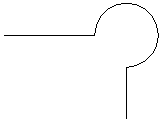
Section 50 You may wonder why the program needs this if expression with its long logical test involving angles aa and cc. Many students have difficulty with this part of the program. It is needed because of the subsequent command function. This function uses the ARC command to draw an arc with center at cen, startpoint at a, and endpoint at c. However, depending on which line was selected first, that arc may be less than 180° or it may be more. For example, with perpendicular lines, the arc may run through 90° or it may run through 270° as shown below (which would be a outside bubble, not a inside cove).
A proper arc will have an included angle of less than 180°, but its absolute starting angle will be less than its absolute ending angle only if the arc does not pass though the zero angle. The logical test detects the two situations in which the arc is too large, and if needed, the points in variables a and c are swapped.
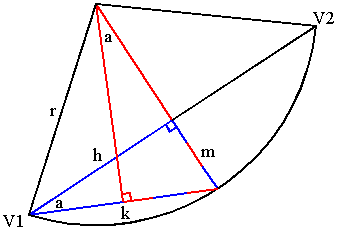
There is another way to solve this problem -- a graphical method rather than a logical one. Consider a line between points a and c. The midpoint of that line will always be on the same side of the center as a proper arc. For that reason, the following code could be substituted for the first four expressions in section 50 as an alternate solution.
(setq mp (polar a (angle a c) (/ (distance a
c) 2)))
(setvar "cmdecho" 0)
(command ".arc" a (polar cen (angle cen mp)
coverad) c)
(setvar "cmdecho" 1)
It would be to your advantage to study and test both solutions.
------ marker ------ beginning of working program ------ try it out ------
;| COVE
Copyright © 1988,1998 Ronald W. Leigh
Input: radius and 2 lines
Output: draws cove
Variables:
a,b,c,d Endpoints of lines
aa,cc Angle from cen to a,c
cen Center of arc (intersection of
two lines)
coverad Radius of cove, GLOBAL
el1/el2 Entity lists
en1/en2 Entity names
oom Old osnap mode
temp Temporary value
b
a
------------------ cen
c
|
|
|
|
|
|
d |;
;10====PROGRAM, SETUP
(defun c:cove (/ a b c d aa cc cen el1 el2 en1 en2 oom temp)
(setq pi 3.1415926535897932385)
(setq oom (getvar "osmode"))
(setvar "osmode" 0)
;20====GET RADIUS, LINES, ENDPOINTS, INTERSECTION
(if (null coverad) (setq coverad 1.0))
(initget 6)
(setq temp (getreal (strcat "\nCove radius <" (rtos coverad
2 4) ">: ")))
(if temp (setq coverad temp))
(setq en1 (car (entsel "\nSelect first line: ")))
(setq en2 (car (entsel "\nSelect second line: ")))
(setq el1 (entget en1) el2 (entget en2))
(setq a (cdr (assoc 10 el1)) b (cdr (assoc 11 el1))
c (cdr (assoc 10 el2)) d (cdr (assoc
11 el2)))
(setq cen (inters a b c d nil))
;30====DETERMINE CODE OF ENDPOINTS NEAREST INTERSECTION
(if (null cen)
(princ "\n**Lines are parallel or coincident. Cove impossible.")
(progn
(if (< (distance cen a) (distance cen b))
(setq code1 10)
(setq temp a a b b temp code1 11))
(if (< (distance cen c) (distance cen d))
(setq code2 10)
(setq temp c c d d temp code2 11))
;40----MODIFY ENDPOINTS
(setq a (polar cen (angle a b) coverad)
c (polar
cen (angle c d) coverad))
(entmod (subst (cons code1 a) (assoc code1 el1)
el1))
(entmod (subst (cons code2 c) (assoc code2 el2)
el2))
(setq aa (angle cen a) cc (angle cen c))
;50----SWAP A AND C IF NEEDED, DRAW ARC
(if (or (and (> aa cc) (< (- aa cc) pi)) (and
(< aa cc) (> (- cc aa) pi)))
(setq temp a a c c temp))
(setvar "cmdecho" 0)
(command ".arc" "c" cen a c)
(setvar "cmdecho" 1)
)
)
(setvar "osmode" oom)
(princ)
)
-------- marker -------- end of working program -------- try it out --------
Sample program 3, polycnc
This program extracts information from a selected polyline and places it in a file. The information that is extracted is the type of information that is often paired with G01, G02, and G03 codes in a CNC file, also known as a "toolpath program." IMPORTANT: The polyline must list as an "LWPOLYLINE" (lightweight polyline).
For the straight segments of the polyline, the beginning and end vertices are simply written to file as X-Y coordinates. For the arc segments of a polyline additional information is written to file which indicates the coordinates of the center of the arc (I-J coordinates), the arc's radius, and the arc's included angle.
The polycnc program does not attempt to create a file suitable for any particular CNC controller. Rather, it intends merely to illustrate the procedure for extracting CNC type information from a polyline.
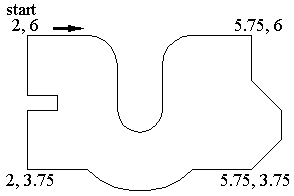
The above polyline contains 19 vertices, with 4 arc segments. Its entity list looks like this:
The polycnc program uses the information from the association list to produce the following file. Since it is a closed polyline (notice the 1 associated with code 70 near the beginning of the above list), the first vertex is repeated at the end of the file. Notice that arcs which run counter-clockwise have positive radii and angles in the file, while clockwise arcs have negative radii and angles.
------ marker ------ beginning of working program ------ try it out ------
;| POLYCNC, Polyline's CNC information sent to file
Copyright © 1999 Ronald W. Leigh
Input: Select polyline, provide name for file
NOTE:
Polyline must be an "LWPOLYLINE"
Output: Writes X-Y coordinates of all vertices
to file.
For arc segments, also writes center (i,j),
radius and included angle to file.
Variables:
ang Angle between v1 and v2
bulge Bulge factor for arc sections of
polyline
(bulge
times halfd equals the bulge distance)
cen Center of arc
cnt Counter
el Entity list of polyline
en Entity name of polyline
fname File name
fw File pointer
halfd Half distance from v1 to v2
i/j X/Y coordinates of center
of arc
incang Included angle of polyline arc
lin Line sent to file
rad Radius
stat Polyline status from code 70,
then "CLOSED"/"OPEN"
sub Sublists from el
sub1/sub2 Pairs of sublists from vlist
v1/v2 Pairs of vertices from el
vlist List holding each vertex X, Y, Bulge
factor
x/y X and Y coordinates of
vertex
|;
:10====PROGRAM
(defun c:polycnc (/ ang bulge cen cnt el en fname fw halfd i j
incang lin rad stat sub sub1 sub2 v1 v2 vlist x y)
(setq pi 3.1415926535897932385)
;20====GET POLYLINE AND ITS ENTITY LIST,
; OPEN OR CLOSED, AND FILENAME
(setq en (car (entsel "\nSelect polyline: ")))
(setq el (entget en))
(setq stat (cdr (assoc 70 el)))
(if (= (rem stat 2) 1) (setq stat "CLOSED") (setq stat "OPEN"))
(setq fname (getstring "\nFile name: "))
;30====BUILD VLIST
(setq vlist ())
(while el
(setq sub (car el))
(if (= (car sub) 10) (progn
(setq x (cadr sub) y (caddr sub))
(while (/= (car sub) 42)
(setq el (cdr el))
(setq sub (car el)))
(setq bulge (cdr sub))
(setq vlist (cons (list x y bulge) vlist))
))
(setq el (cdr el))
)
(setq vlist (reverse vlist))
;40====IF CLOSED POLYLINE, ADD FIRST x,y,bulge TO END OF VLIST
(if (= stat "CLOSED")
(setq vlist (append vlist (list (car vlist)))))
;50====FOR EACH VERTEX, EXTRACT X & Y
; IF NEEDED CALC. CENTER(i,j), RADIUS,
& INCL. ANGLE
; SEND TO FILE
(setq fw (open fname "w"))
(setq cnt 0)
(while vlist
(setq sub1 (car vlist))
(setq x (car sub1) y (cadr sub1) bulge (caddr sub1))
(setq lin (strcat "X=" (rtos x 2 4) ",Y=" (rtos y 2 4)))
(write-line lin fw)
(setq cnt (1+ cnt))
(if (and (/= bulge 0.0) (> (length vlist) 1)) (progn
(setq v1 (list x y))
(setq sub2 (cadr vlist))
(setq v2 (list (car sub2) (cadr sub2)))
(setq halfd (/ (distance v1 v2) 2.0) ang (angle
v1 v2))
(setq incang (* 4 (atan bulge)))
(setq rad (/ (+ (* halfd halfd) (* bulge bulge
halfd halfd))
(* 2 bulge halfd)))
(setq cen
(polar (polar v1 ang halfd) (+ ang
(/ pi 2)) (- rad (* bulge halfd))))
(setq lin (strcat "
I=" (rtos (car cen) 2 4)
",J=" (rtos (cadr cen) 2 4)
",R=" (rtos rad 2 4)
",A=" (rtos (* incang (/ 180 pi)) 2 3)))
(write-line lin fw)
(setq cnt (1+ cnt))
))
(setq vlist (cdr vlist))
)
(close fw)
(princ cnt)
(princ " lines written to ")
(princ fname)
(princ))
-------- marker
-------- end of working program -------- try it out --------